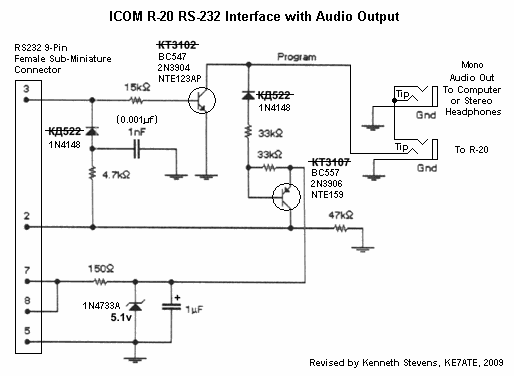
Making the connection between your ICOM R-20 Communications Receiver and your computer can be a very confusing task at first, but with the help of the Internet, you will find it really isn't difficult to do. This section discusses the serial cable that send control data between the receiver and the computer, not the mini-USB connector that is used to transfer the stored audio from the receiver to the computer. This is another type of cable, which may be found on ebay or from ICOM and is used for transfering audio files and setting memories on the R-20 receiver. When you want to connect the receiver to the computer for the purpose of controlling the receiver during listening sessions, there are three different methods available. 1. A commercially available cable - found on ebay or other online retail radio supply web sites. 2. A homebrew interface box and cable. This is the one that beats them all...hands down. 3. There is the CI-V box available from ICOM or a similar homebrew box. I like simple and my choices were simple when I wanted to make the connection between the receiver and my computer, purchase a ready made cable or build my own. So I did both to see if there were any differences in price and quality. I found there was pretty much only one cable available on ebay for the R-20 receiver. Yes, the cost was outrageous (At, least in my mind it was expensive). I purchased a MAXON cable for $24.95 + about $8.00 in shipping. Yes...ouch...that hurt. $33.00 dollars of cable that would split the audio and the control signal from the radio. I used it for a long time, until I started to do some research about the matter on the Internet and found a simple circuit to do the same job with just a handful of parts. The only problem was that the transisters where listed with Russian numbers. However, I did some further research and found US equivalents for the transistors and the diodes. I confirmed my substitutions with some transistor model calculations the determined the circuit was good. The revised circuit diagram and a link to the original circuit is listed in my help files for my software. I built the circuit for around ten dollars and found it worked perfectly.

Note: You can use a Tantalum Capacitor for the Electrolytic shown in the schematic if you want, I used an electrolytic because it was cheaper and it was all I had on hand at the time. All resistors are 5% tolerance. I wouldn't give those 'Made in China' ebay vendors another penny for their over-priced cables and just make my own interface to minimize my use of audio adapters and configuring it to better match my own setup and wiring preferences (See photo below). There are some benefits to building your own interface box. 1. You can add a couple extra 1/8" stereo phone jacks to split the outgoing audio at the box and reduce the number of splitters and adapters you would need to use if you utilized the commercial cable.
2. You can configure the connectors to be what suits you. 3. You pay a third of what it costs if you purchased a commercial cable.
4. You can know without a doubt that my circuit revision works, because I have already built and tested it.
It is important to understand you will want to split the audio to hear the receiver audio while you are using the audio portion of my software. I had to do this because my fancy DELL laptop and Windows Vista won't let me hear audio through the computer speakers, as it is being fed into the computer's audio input port. Lastly, if you plan on running ANY control software on a new or recently manufactured computer system. You will be very disappointed to find that it will not include a 9-Pin serial port. This may be easily resolved by purchasing a USB to Serial Port Cable/Bridge. This type of cable converts the USB signals to Serial port signals (It has a tiny interface built into it.) It is a 'must have' for running ANY type of control software. So, it is an unavoidable expense to connect to your new WIndows, Linux or Mac box. I highly recommend that you purchase a cable that is 'quality'. DO NOT BUY THE REALLY CHEAP ONES FROM EBAY ($2.88). These cables DO NOT WORK. I have had no end of problems with these cables. 1. The drivers will not install correctly. Although, the computer recognizes the cable. They will not work.
2. Some cables are not BI-DIRECTIONAL. Choose a good cable such as 'Belkin' or some other well known brand. Do some research and pay the $24.95 + shipping for a good cable, or build the cable from the schematic in my help file as shown above. You won't be disappointed with the results. It really depends on how much you are willing to spend or how much effort you want to make. I like to use cables that use the prolific drivers, because I have found these drivers to actually work with good quality cables. Although, the ebay cheapy ones use these drivers, the cables are poor quality and won't work properly (It's that 'Made in China' problem again). Here are the photos of my setup for each of the above mentioned cables.
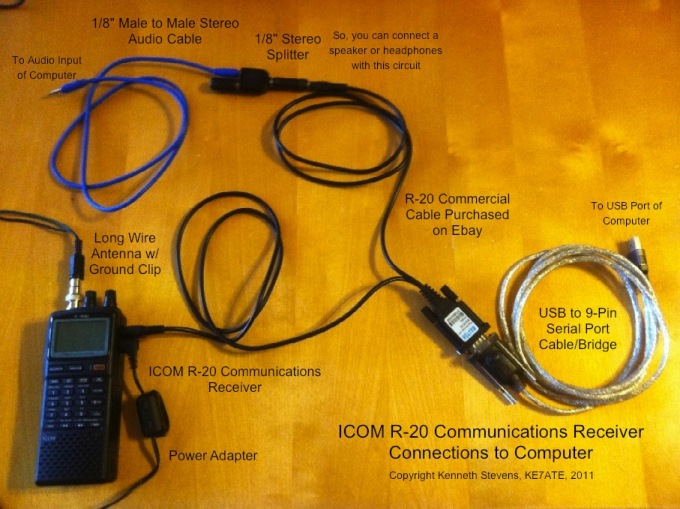
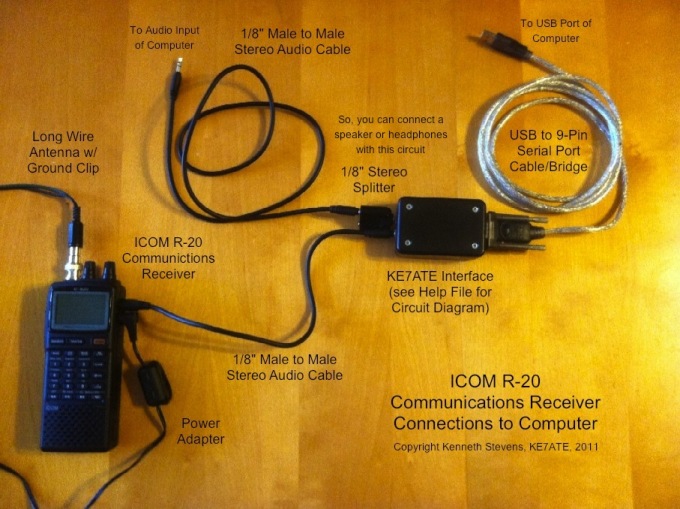
Both cable set ups work perfectly, without any problems. You may notice that my homebrew set up has less cables, because I could design my homebrew set up to be in any configuration I wanted. The commercial cable already had long cable on it that split the audio and control signal. Also the commercial cable had male connectors where I need female type of connectors. So, I had to add gender changers to properly connect it split the audio and connect to my computer. The more connectors and gender changers you have in your audio path, the more noise you add to the audio signal. You can of course, use the very expensive CI-V box from ICOM and its homebrew derivatives. These are great for controlling several ICOM radios at one time. I can not see the point or the expense. I really only use one receiver and a transceiver at one time anyway. I hope this information helps you find the right cable for you. You are also welcome to email me if you have any questions about my interface.

This page was last updated: June 27, 2011
Copyright 2011,
Kenneth Stevens, KE7ATE
ke7ate@yahoo.com